Anatomy of a Cloud, pt. I
“The cloud is just someone else’s computer”
Heard that before? It’s true. The cloud is not this magical, ephemeral thing - it is very real. On almost every continent there are datacenters filled with hundreds of rows of servers, churning through the world’s information, comprising what is collectively referred to as ‘the cloud.’ The cloud is attractive because of the economy of scale it provides. If you want data resiliency, cloud providers can deliver that and do it cheaply just because of the sheer amount of raw compute at their disposal. Sooooo you shop around, pick the best/cheapest/securest/easiest cloud provider, sign up to pay a few bucks every month to Big Data®, and now your data can live on even when your devices don’t.
You can do this if you want, you’ll get no grief from me. I had a subscription to OneDrive for several years, which I had increased to 2 TB within the last year. However, if you already host things, and prefer open source solutions over handing over your money or personal data to third parties then it doesn’t make any sense to pay for a service. I am able to roll out a self-hosted cloud with just the cost of the hardware (which will pay for itself once you ditch the subscription), and it will still have the features I need. I have to break it into two parts but I’ll explain how I did it (part II coming soon).
You need a plan
You can’t just roll out a cloud willy-nilly. You have to put some thought into this for it to be effective. To get started, I thought about the features I knew I wanted to retain once I canceled my the subscription. OneDrive is very feature-rich but I really only need this core functionality:
- Resiliency and redundancy, obviously
- Access to my files from anywhere over the internet
- Automatic sync location for my phone photos
My resiliency litmus test is this: if my house burned down would I lose any data? With OneDrive the answer is most likely no (if my house AND the cloud burned down at the same time that would be w i l d). So I need at least the same resilience in my own cloud.
Plan out your hardware too. You have one copy of data already - we’ll call this your primary data and its size is N GB. First, consider future growth and add that to N. Then multiply this by at least three. If you want something even beginning to resemble cloud resiliency, this is important. With the three copies between two sites that we’re about to set up, you can decide whether or not to host additional copies of the data at further remote locations for added resiliency. Go crazy, it’s your cloud. Again, the hardware pays for itself.
In order to keep your operation costs down, you can opt to run low-power SBCs for your cloud but you can apply this tutorial to Debian Linux distros on whatever hardware you want. Here’s the hardware I’m using:
- 2 Raspberry Pi 5s, plus power supply, 16 GB SD card for the OS
- 2 Waveshare PCIe dual-NVMe HAT+ SSD controllers
- 4 x 2 TB PCIe NVMe SSDs, at least PCIe Gen 2 to get the maximum performance you can get from a Raspberry Pi
- You probably want some kind of case for the Pis, I just use these simple Vilros acrylic cases. If you want something more durable, this KKSB case supports a Pi with HATs and is way more heavy duty
- My original data lives on my desktop PC on a 4 TB SATA III disk
Lastly you need to logically plan how this will all fit together before you begin deploying anything. An architecture diagram is a great tool that helps visualize the plan, which you can share and gather feedback or advice from others. I posted my diagram on Reddit and got really helpful feedback (generated with Excalidraw):
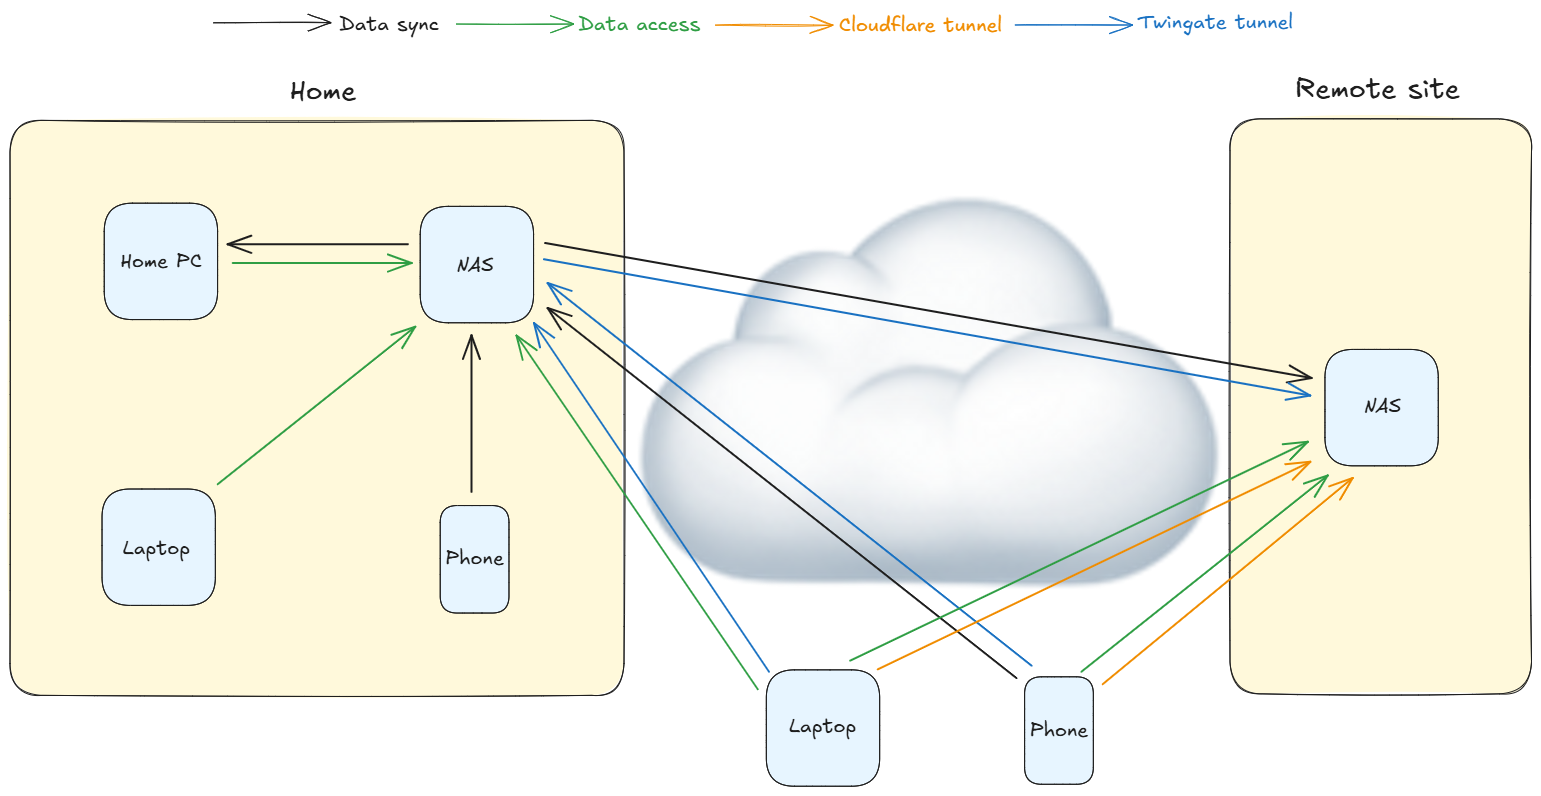
This was my plan:
- Build a new local NAS
- Move primary data from the desktop to the new NAS
- Sync my phone photos to the local NAS (now part of the primary data)
- Sync a copy of the primary data back to the desktop - this is the new secondary
- Build a new remote NAS
- Sync my primary data to my remote NAS - copy #3
- As a practice, only work on the primary data. Changes will be synced to the secondary and remote copies
The solution
In addition to being able to do what I need it to do, I usually have other software requirements like being open source and able run in a container. These are what I landed on:
- Syncthing - the solution that keeps everything synced up
- FileBrowser - a web front end for a file server
- Twingate - the remote access solution I was already using to reach other things in my homelab
- Cloudflare - allows internet access to the FileBrowser instance via a secure tunnel
- Cloudflare domain - buy a website for a true cloud experience
Let’s build a cloud
Preparing the local NAS
Start your project with all devices on the same LAN for faster data syncing
-
Assemble the HAT and disks to the Raspberry Pi and start by installing Raspberry Pi OS 64-bit lite (no GUI) using the Raspberry Pi Imager
- Update it:
1
 sudo apt update && sudo apt full-upgrade -y
- Update the firmware:
1
2
3
 sudo rpi-eeprom-update # to see the current build and if a new build is available
 sudo rpi-eeprom-update -a # to apply the new build
 sudo raspi-config
- Select Advanced options > Bootloader version
- Select Latest
- Latest version bootloader selected - will be loaded at next reboot. Reset bootloader to default configuration? Select No (selecting Yes will undo what you just set)
- Exit raspi-config and accept the prompt to reboot now
- Set the PCI speed to gen 3:
1
sudo raspi-config- Select Advanced options > PCIe speed
- Would you like PCIe Gen 3 to be enabled? Select Yes, then OK
- Exit raspi-config and accept the prompt to reboot now
- Verify you have no hardware issues. NVMe SSDs on Pis are notorious for compatibility issues. I winged it (wung it?) and went for some good deals on Newegg and (mostly) lucked out - your mileage may vary. There are some lists on the internet with the tested Raspberry Pi 5 compatible NVMe SSDs if you need reassurance:
1
 dmesg | grep -i nvme
(optional) Do some load testing:
1
2
3
4
 sudo apt install hdparm -y
 blkid # make note of the NVMe device path
 sudo hdparm -t --direct /dev/nvme0n1
 sudo hdparm -t --direct /dev/nvme1n1
- Do this several times per disk to get a rough disk speed average
- In a separate terminal run
dmesg -w | grep -i nvmeto monitor for disk or other hardware failures
- Set up a disk array:
1
2
3
 sudo apt install mdadm -y
 sudo fdisk -l /dev/nvme* # make note of the disk paths
 sudo mdadm --create /dev/md0 --level=0 --raid-devices=2 /dev/nvme0n1 /dev/nvme1n1
See the array details:
1
 sudo mdadm --detail /dev/md*
Create a filesystem on the array:
1
 sudo mkfs.ext4 /dev/md0
Create a directory and mount the filesystem to it:
1
2
 sudo mkdir /mnt/syncthing
 sudo mount /dev/md0 /mnt/syncthing
Set the array to automount at reboot:
1
 sudo nano /etc/fstab
Add this to the end, save and exit:
1
 /dev/md0  /mnt/syncthing  ext4  defaults  0  0
- Install Docker:
1
2
 curl -sSL https://get.docker.com | sh
 sudo usermod -aG docker $USER
Log out and log back in
- Install Syncthing:
1
2
3
4
5
6
7
 sudo adduser syncthing # create Syncthing user and provide password
 id syncthing # make note of the UID and GID
 cd /mnt/syncthing
 sudo mkdir docker
 sudo mkdir docker/syncthing
 cd docker/syncthing
 sudo nano compose.yaml
I updated the example from the Syncthing page to reflect my server:
1
2
3
4
5
6
7
8
9
10
11
12
13
14
15
16
17
 services:
   syncthing:
    image: syncthing/syncthing
    container_name: syncthing
    hostname: LOCAL-NAS
    environment:
      - PUID=syncthinguser-uid
      - PGID=syncthinguser-gid
    volumes:
      - /mnt/syncthing:/var/syncthing
    network_mode: host
    restart: unless-stopped
    healthcheck:
      test: curl -fkLsS -m 2 127.0.0.1:8384/rest/noauth/health | grep -o --color=never OK ||    exit 1
      interval: 1m
      timeout: 10s
      retries: 3
Save and exit. Now run
docker compose up -dto start the container. If you navigate up a directory you’ll notice that Docker created new directories. You can specify where you want Docker to create the runtime environment in thecompose.yamlvolumesvariable. If you change it, make sure you map to a directory on the disk array or it will fill up the local SD card when you start sending files to it. Ask me how I know. -
Set up the first Syncthing share:
Open a web browser to
nas-hostname-or-IP:8384and familiarize yourself with the Syncthing interface. Set an admin password to get rid of the obnoxious warning on the dashboard. Click the Default folder > Edit to see how sharing works. This is theSyncdirectory that Docker created, you can see the path in the settings is/var/syncthing/Sync. When you click the Sharing tab you see that there are no devices to which you can share, or sync, the folder. We’ll be adding more devices later.If you are okay with using the default folder as your share folder, you can skip to the next step. That folder name will be visible across all synced devices and if that’s how you want to live your life, that’s cool man. I’m seldom satisfied with any out-of-box configuration, I need something a little more custom. I delete the default folder and create a new one, and gave it the name I always wanted:
pimpdata. Back on the command line of your NAS, if you runls /mnt/syncthing/docker/syncthingyou’ll see that Docker created a new directory with the same name as your shared folder name.If you deleted the default folder from the Syncthing UI, you’ll also notice that the
Syncdirectory was not deleted. This is a safety feature to protect your data if someone accidentally deleted the folder in the UI. It’s also worth knowing because if you deleted a Syncthing folder expecting the space to be freed up on the NAS, you’ll have a bad time when it fills up much quicker than you expected. Again, ask me how I know. - To begin syncing the data, you need data to sync in the first place. To accomplish that, set the new data directory up as an SMB share:
1
2
sudo apt install samba samba-common-bin -y
sudo nano /etc/samba/smb.conf
Add this to the bottom of the file, edit to your situation:
1
2
3
4
5
[pimpdata] # this is the name of the share as seen in your local desktop file browser
path = /mnt/syncthing/docker/syncthing/pimpdata
valid users = smb
read only = no
browseable = yes
Save and exit, then restart the smb service:
1
sudo systemctl restart smbd
Create a service account for accessing the network share. I don’t have a domain set up in my homelab so I just use local accounts for everything. It’s fine.
1
sudo adduser smb
Now create an SMB password (I just use the same password as the smb account):
1
sudo smbpasswd -a smb
Change the permissions on the directory so you can access and write to it:
1
sudo chmod 777 /mnt/syncthing/docker/syncthing/pimpdata
This sets the directory permission to read/write for “all”. But since the SMB user is the only one allowed to access the share (per the SMB configuration
valid userssetting), “all” is pretty limited. Just use a secure password. -
At this point you should be able to access the SMB share over the network and begin transferring your data. Open your file browser of choice to
smb://nas-hostname-or-IP/pimpdataor\\nas-hostname-or-IP\pimpdata, provide the SMB user credentials, and start copying your garbage.On a Raspberry Pi: if there is a hardware issue to be had it will present itself here. During file transfer you should monitor
dmesg -w | grep -i nvmefor disk errors on the NAS. I know what I signed up for but the moral of the story is if you want your cloud to be resilient you should be relatively certain you have good hardware. Seriously test the shit out of it.If everything is working as expected, move on to your remote NAS.
Preparing the remote NAS
-
Repeat steps 1-8 so that you have a Syncthing portal just like your local NAS. During setup be sure to update the different configs/options to reflect the hostname of this server.
-
In the remote NAS Syncthing portal, you will see the same default shared folder - feel free to remove this if you want but do not create a matching
pimpdatafolder here (or your equivalent). Instead, this will be created during the syncing process. -
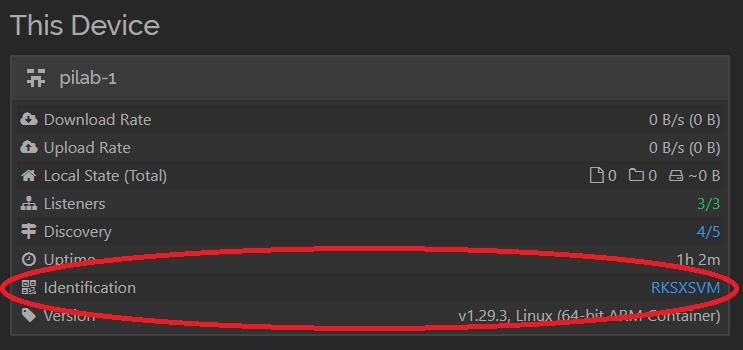
Make a note of your device ID - this is generated when you deploy the container. You’ll need it in the next step. It looks like this:
-
Open the local Syncthing UI and under Remote Devices, click
Add Remote Device. You should see the new device in your list (or multiple if you do a lot of syncing and testing):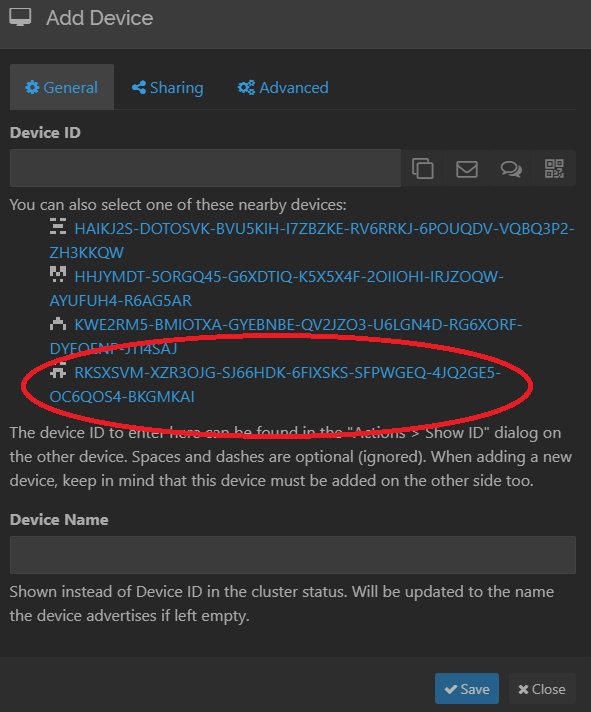
Click the device link and click Save. There’s no need to name it, Syncthing will pick up the remote device name from the configuration on that server.
-
In the remote Syncthing you should now see a banner asking if you accept the device add request from the local Syncthing, click yes. The local and remote Syncthing instances both appear on each dashboard.
Setting up your first sync
-
Now is the time to start testing how the sync works. From the local Syncthing click your shared folder > Edit > Sharing. You should see the remote NAS device as an option, check the box.
-
When you do this, an Advanced tab will appear. Click it, then change the Folder type to
Send Only. This makes the data on my local NAS the source of truth, which is what I want - you may have a different preference. Hopefully you thought about this during your planning phase. You went through a planning phase right? -
As soon as you click Save, the folder will immediately begin syncing whatever data you put in the share directory, to the remote NAS. This is why I suggest doing this with all devices in the same network, rather than try to sync 2 TB of data over the internet. It’s just not good form.
Set up the remote sync
Speaking of syncing over the internet, next you’ll deploy some Twingate magic. This is what allows you to sync 2 TB of data over the internet if you really want to.
-
Sign up for a free Twingate account.
Listen, I know. I know we are pro-privacy and anti-personal-data-sharing and everything but, Twingate uses one of four major identity providers for authentication, combined with 2FA login, so you get a ton of security. But if you’re like me, you already have a Google or Microsoft account that you’ve had for years and years, which is probably already being used as an identity provider for other things anyways. Truthfully, I do have a lot of stuff that relies on it so while I can ditch the Microsoft cloud relatively easily, I can’t lose the Microsoft account quite yet. Twingate also doesn’t have ads because they have enterprise plans that pay the bills so they’re able to offer this piddly stuff to us peasants for free. So anyways, that’s why I’m cool with it.
-
Refer to the quickstart guide and set up a remote network and add the remote NAS as your first resource. You will also create your first connector which is used to create the tunnel. I have Twingate connectors already running in my network so I can access various things remotely - that’s the typical use case. Here, we’re setting up the remote NAS to be available remotely. Create the Docker Compose connector(s) and generate the access and refresh tokens.
- Deploy the connector containers to your remote NAS:
1
2
3
4
 cd /mnt/syncthing/docker
 sudo mkdir twingate-connector-1
 cd /mnt/syncthing/docker/twingate-connector-1
 sudo nano compose.yaml
Add this and update with your Twingate network name, container name, access token, and refresh token, then save and exit:
1
2
3
4
5
6
7
8
9
10
11
 services:
 twingate-connector:
   container_name: twingate-[connector-name] # Ex. funny-sloth
   image: twingate/connector:latest
   restart: always
   environment:
     - TWINGATE_NETWORK=[your Twingate network name]
     - TWINGATE_ACCESS_TOKEN=[from Twingate]
     - TWINGATE_REFRESH_TOKEN=[from Twingate]
   sysctls:
     net.ipv4.ping_group_range: "0 2147483647"
Start the container:
docker compose up -d. Repeat the process for a second connector if you want. In the Twingate console you should see your connector has a green status. -
Create a Twingate Service. This is basically a service account allowed to do things on your behalf, such as automatically sign in to your remote NAS and sync your data.
- Create a service key:
- Set the expiration according to your own needs
- Make a record of the key immediately - the key displayed on the screen won’t be visible again once you leave there. Copy and save it as a file on the local NAS and name it
service_key.json. Make a note of the path - Add your remote NAS resource to the service
- The local NAS can connect to the remote NAS over the Twingate tunnel once we install the Twingate client. We’ll run it in headless mode (which requires the service key you just created) so that it connects automatically with no interaction required. SSH into your local NAS:
1
2
3
4
5
 cd ~
 curl https://binaries.twingate.com/client/linux/install.sh | sudo bash
 sudo twingate setup --headless /path/to/service_key.json
 sudo twingate config autostart true
 sudo twingate start
Verify the client connection is active:
twingate status -
Test! Hopefully you’ve played around with Syncthing folders, maybe added some devices, and performed some test syncing. Once you verify the Twingate client starts automatically and the Syncthing sync statuses are green across the two devices, power down your remote NAS and power it up at your remote location.
Everything works over the internet so you just need to connect the remote device to the network and it comes up. You can check the local Syncthing to verify. If you want to see the remote Syncthing (and you aren’t on site), you have remote access to the server via the Twingate tunnel. If you install the Twingate client for your own device and sign in, you can securely sign in to the remote Syncthing interface as if you were on site. You can also connect to the remote NAS to do troubleshooting if you need to assuming networking isn’t the issue.
Copy #3
So far in my case I have three copies of data but they aren’t all set up to sync, the original data is still just sitting on the old OneDrive folder on my spinny disk. The local NAS is now the primary data which performs way better than that disk, even over the wire. I just need to send the 1’s and 0’s to the disk.
- Install Syncthing on a third device. As shown in the diagram, I’m using my desktop PC to host the tertiary copy of my data. It’s a Windows PC and Syncthing has an installer for it. Once you install Syncthing for your device you’ll get a message asking if you want to open the console. Click yes and your browser opens to the same Syncthing client you saw on the local and remote NASs. Access it anytime by opening your browser to
127.0.0.1:8384. On the console, make a note of your device ID. - From the local NAS Syncthing, add another remote device. The device is on the same network as my NAS and picked up the device ID of my desktop. Click the device but don’t share any folders yet, and click Save. On your device Syncthing console, accept the invitation and click Save.
- On the NAS Syncthing (drink every time I say Syncthing), click the folder you want to share and click Edit. Click Sharing, then check the box for your new device. Click Advanced, and set the Folder Type to
Send Only(or whatever you planned out here), and click Save. Back on the device, accept the invitation for the folder share. You can specify where the folder should be synced in the Folder Path field. For my desktop, I’ll create a directory at the root of my data drive and replace the~in the Folder Path with the Windows path. Click the Advanced tab to set your Folder Type - I set it toReceive Only. Now watch your files come pouring in. - Updates to your new primary data will sync automatically to the desktop whenever it’s up.
Wrapping up
If you made it this far, kudos to you. It wasn’t until this point that I realized that I needed to break this post into two parts. In part II I’ll walk through how I set up a web front end for my files and picture sync on my Android phone, and discuss some of the caveats and limitations of this whole thing. And probably make jokes.